Import Time Activities into QuickBooks Desktop using Business Importer. Import Time Tracking with or without Rate Fields. Check out the guide how to import Time Activities in Excel into QuickBooks Desktop. Don’t wait! Run several imports simultaneously – save your time!
Video Guide: How to import Time Activities with and without Rate Fields into QuickBooks Desktop using Business Importer
Import Time Tracking without Rate Field
To import Time Activities into QuickBooks Desktop, follow 3 simple steps:
Connect QuickBooks Desktop and Business Importer. Select company you’re going to import Time Activities into.
Step 1: Select your file (Excel or CSV) containing Time Activities. Select sheet in your file. Select a QuickBooks transaction or list type to import.
Note: Open Settings – and enable all available features in Business Importer – to autocreate Products, Accounts, Customer/Vendors, and more.
Click on the Next button.
Step 2: Mapping
Connect your labels to QuickBooks Desktop labels.
Save your Mapping to use it in subsequent imports, or upload the saved import.
Click on the Next button.
Step 3: Preview
Preview your Time Activities you are importing into QuickBooks Desktop. Make sure all labels are mapped in a correct way.
Note: You can correct values in the table, if necessary.
Click on the Next button.
Import Time Activities into QuickBooks Desktop using Business Importer: Result
Your import of Time Activities is in process! Don’t wait until it’s finished. Start new import. Run several imports simultaneously in Business Importer.
View import log when the import is finished.
Check out the import result in QuickBooks Desktop – all Time Activities are imported correctly into QuickBooks Desktop using Business Importer.
Import Time Tracking with Rate Field
To import Time Activities into QuickBooks Desktop, follow 4 simple steps:
Connect QuickBooks Desktop and Business Importer. Select company you’re going to import Time Activities into.
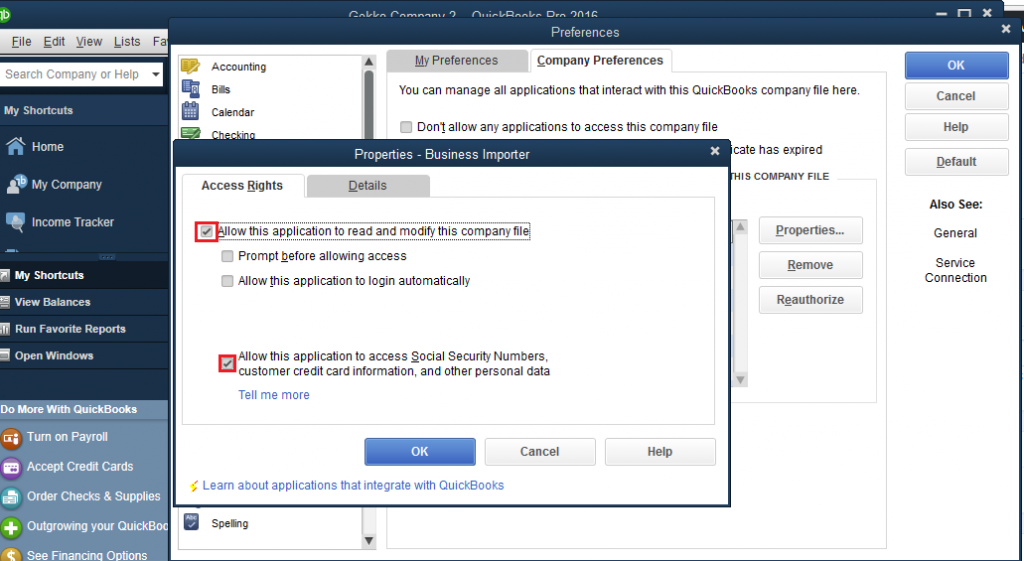
Step 1: Go to QuickBooks Desktop > Edit – Preferences – Integrates Applications – Company Preferences
Choose Business Importer, click on the Properties button, and enable the following field:
Allow this application to access Social Security numbers, customer credit card information, and other personal data.
Click on the OK button.
Step 2: Go to Business Importer.
Select your file (Excel or CSV) containing Time Activities. Select sheet in your file. Select a QuickBooks transaction or list type to import.
Note:
- Open Settings – and enable all available features in Business Importer – to autocreate Products, Accounts, Customer/Vendors, and more.
- Settings – Payroll
Enable “Add Rate field to create Payroll items” to add rate fields to your Time Activities.
Enable “Enter Start and End Date Times for Time Tracking” (if needed; see more in our example).
Click on the Next button.
Step 3: Mapping
Connect your labels to QuickBooks Desktop labels.
Save your Mapping to use it in subsequent imports, or upload the saved import.
Step 4: Preview
Preview your Time Activities you are importing into QuickBooks Desktop. Make sure all labels are mapped in a correct way.
Note: You can correct values in the table, if necessary.
Click on the Next button.
Import Time Activities with Rates into QuickBooks Desktop using Business Importer: Result
Rate fields Imported:
Time Activities Successfully Imported into QuickBooks Desktop:
Use Business Importer to import transactions in Excel into QuickBooks Desktop.
Remember, that any question you can address us. We will be glad to help you!
Just leave us a message, call us on (469) 629-7891 or write to support@cloudbusinesshq.com.
Download Business Importer now! 14 day free trial! 
To download Business Importer and use free trial: press here.
To purchase Business Importer and use the full version: press here.
More information about the app is available on this web-page.


