
How to map data correctly importing to QuickBooks Online
This guide will help you to import anything from excel/csv files to QuickBooksⓇ Online and make your next imports even easier if you use help me with a mapping feature.
Overview:
Who will help me with mapping and where to find this option?
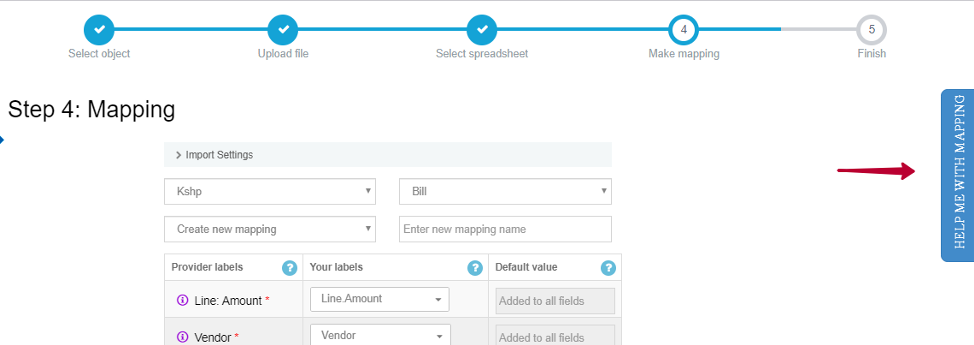
Start your import, click on upload file, select the a type of transactions you want to upload, choose the file, select the sheet (if you have several) and here we go, you are on the mapping step!
The overall point of mapping is to map the column headings from your import spreadsheet to the appropriate QuickBooks field. This makes the app very flexible.
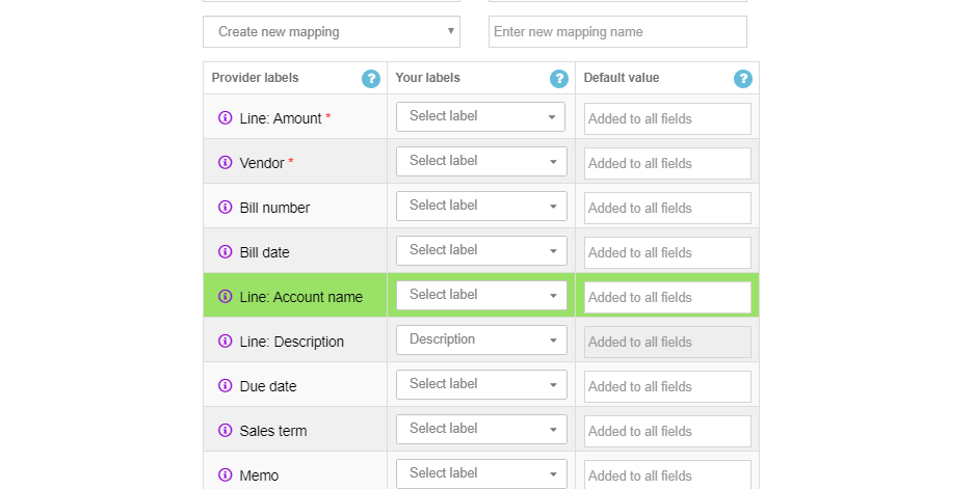
Section 1 underlined on the screenshot – Provider Labels – is the list of all the QuickBooks fields.
Section 2 – Your Labels – provides the dropdowns with the list of headers from your file.
Alternatively instead of Section 2 you can use Section 3 – Default Value – in case you want all of the transactions to be imported with the same value.
Note: either Section 2 OR Section 3 will be available, you can use either a column from your spreadsheet OR the default value for all lines

So you need to select the right column header in front of the QuickBooks fields needed.
Note: make sure you use excel/csv line number 1 for the headers.

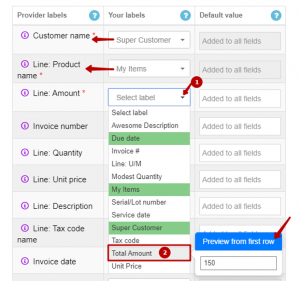
Step 1: drop down the list of headers form your file
Step 2: select the header needed
Useful tips on mapping:
- the app will mark mapped headers green in the dropdown for your convenience, however you can map one column to several QuickBooks fields
- the app will also show the preview of the data from the first row
you can map only the fields needed and leave others blank (saying “Select label”). - Make sure you have mapped required fields, they are marked with red asterisks on mapping
- The app will “see” only mapped columns of your file
Once you have mapped all the fields needed – you are ready to upload data.
How to use mapping helper
On the right there is a blue field, the feature that can make your mapping more logical and easy – an automatic mapping helper!
Once you open it you will see a transaction field how it looks like on QuickBooksⓇ Online side. Let’s take a look at the example of the Bill. Click any field and the app will transfer you to the line you need to map in a table.

That way you can click on every field to find out where this information should be reflected on QuickBooksⓇ Online side.
Once you finish with mapping continue your import and enjoy results on QuickBooks end!
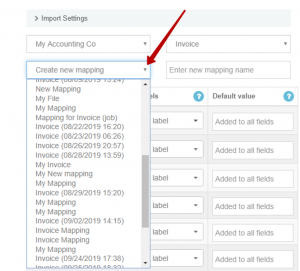
Save, rename and delete mapping
Every time you import your file, Business Importer app saves it. So there is no need to map your file each time! The next time your import can be faster, as you will just select the name of the mapping and the app will automatically map your file accordingly.
Where can you see all your mappings? You have access to all your mappings saved from the mapping step. Please click the dropdown under Create new mapping to see every saved mapping in the app.
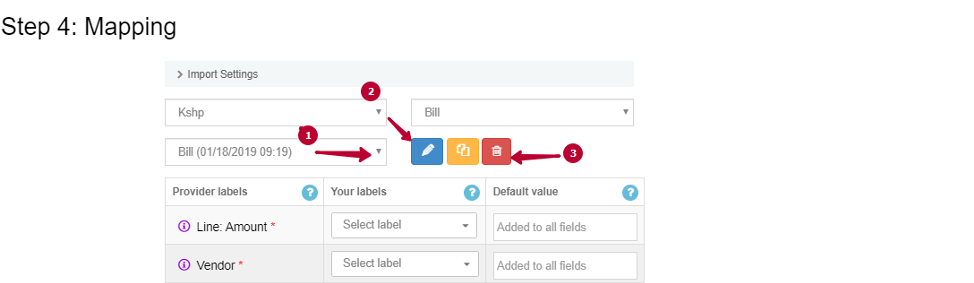
How to rename and delete mappings
The app creates your mappins by the type of transactions and the date and time you were importing your files, however you can rename them. Please choose the mapping you want to rename from the drop-down menu (step1). Click on the pencil icon (Step 2) if you want to rename it.
If you want to delete any mapping , select one and click on delete (step 3).
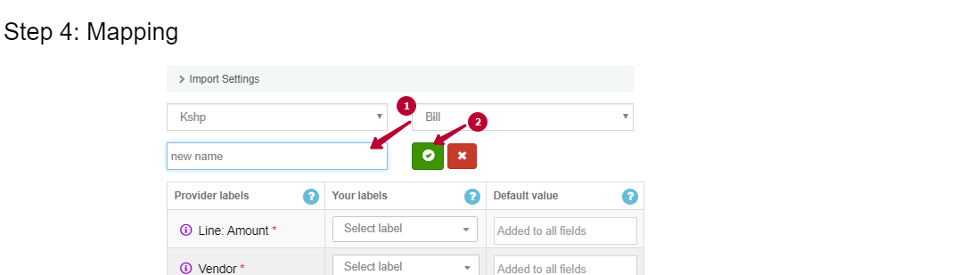
Once you click pencil to edit the name, please, enter the name of the new mapping and click on the green button. Now you can see your mapping under a new name in a drop down menu.
Please Note, if you have any questions, let us know in online support chat, or use our contacts below to email or call us! We will be happy to help!
Remember: if you have any questions you can address them to us. We’ll be glad to help you!
Just leave us a message filling out our contact form or use the phone/email mentioned in the footer of every page.