
Import Inventory Adjustments into QuickBooks Desktop using Business Importer. Check out the guide how to import Inventory Adjustments in Excel into QuickBooks Desktop. Don’t wait! Run several imports simultaneously – save your time!
How to adjust inventory in QuickBooks Desktop using Business Importer
Import Inventory Adjustments into QuickBooks using Business Importer: Important Notes
Quantity or Value Adjustments – apply 3 types of adjustments:
1) If you specify New Quantity (or Quantity Difference) only, will by applied Quantity Adjustment Type.
2) If you specify New Value (or Value Difference) only, will by applied Total Value Adjustment Type.
3) If you specify New Quantity (or Quantity Difference) and New Value (or Value Difference), will by applied Quantity and Total Value Adjustment Type.
Generate Reference Numbers – there are 2 ways to asign reference numbers to your transactions.
Go to Settings – General:
- if you turn on Apply Reference number from import file to transaction, your imported documents will have Reference Numbers taken from your Excel file. Map the Inventory Adjustment number column.
- if you turn on Generate RefNumber automatically, your imported documents will have Reference Numbers automatically assigned according to consequence.
Multi-Lined Inventory Adjustment –
To import multi-lined Inventory Adjustments into QuickBooks Desktop using Business Importer:
- Use the same document number to transaction;
- Use different item names within multi-lined Iventory Adjustment.

Option 1: How to adjust Quantity of inventory item
Import Inventory Adjustments into QuickBooks
Connect QuickBooks Desktop and Business Importer. Select company you’re going to import Inventory Adjustments into.
Step 1: Select your file (Excel) containing Inventory Adjustments.

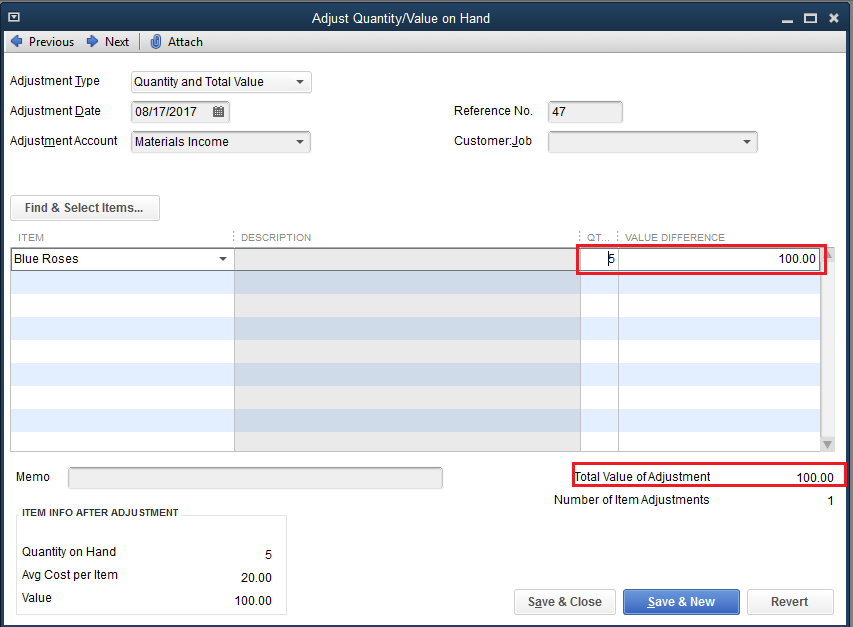
To adjust quantity of Inventory Items, use Line: New Quantity or Line:Quantity columns in your Excel.
Line: New Quantity – insert new quantity of your Inventory Items.
Line: Quantity Difference – insert the difference in quantity in your Inventory Items.
Step 2: Select sheet in your file. Select a QuickBooks transaction or list type to import (Inventory Adjustments).

Click on the Next button.
Step 2: Mapping
Connect your labels to QuickBooks Desktop labels.
Save your Mapping to use it in subsequent imports, or upload the saved import.

Click on the Next button.
Step 3: Preview
Preview your Inventory Adjustments you are importing into QuickBooks Desktop. Make sure all labels are mapped in a correct way.

Note: You can correct values in the table, if necessary.
Click on the Next button.
Adjust Inventory items’ quantity in QuickBooks Desktop using Business Importer: Result
Your import is in process! Don’t wait until it’s finished. Start new import. Run several imports simultaneously with Business Importer.

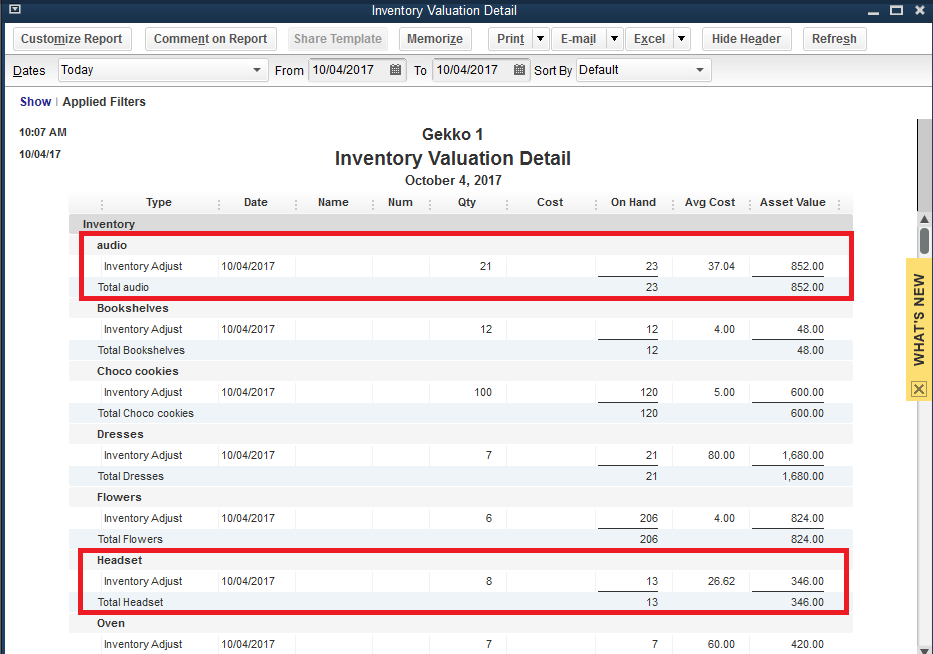
Check out the items adjustments results in QuickBooks Desktop Reports.
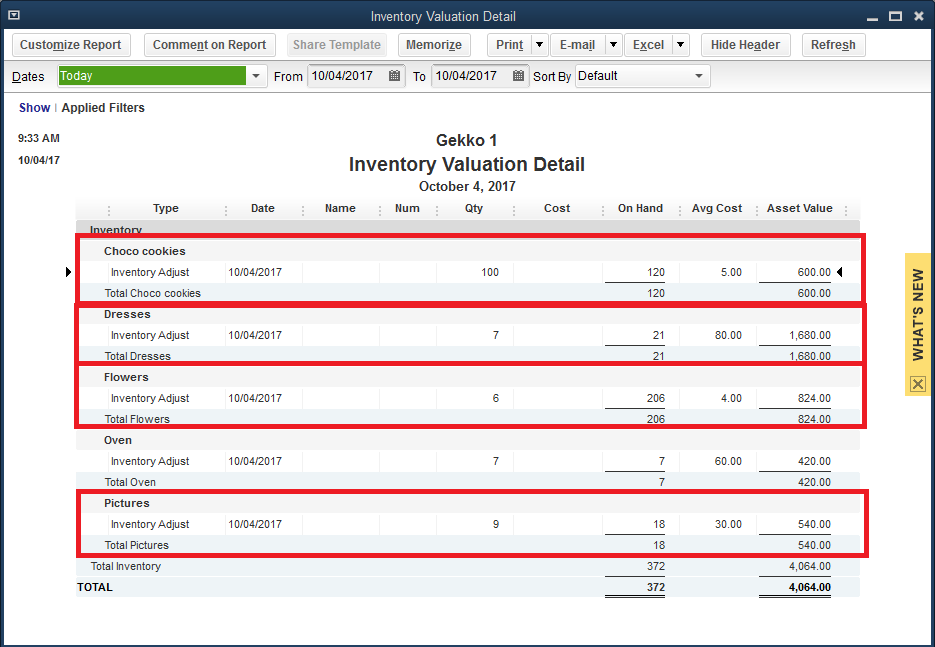
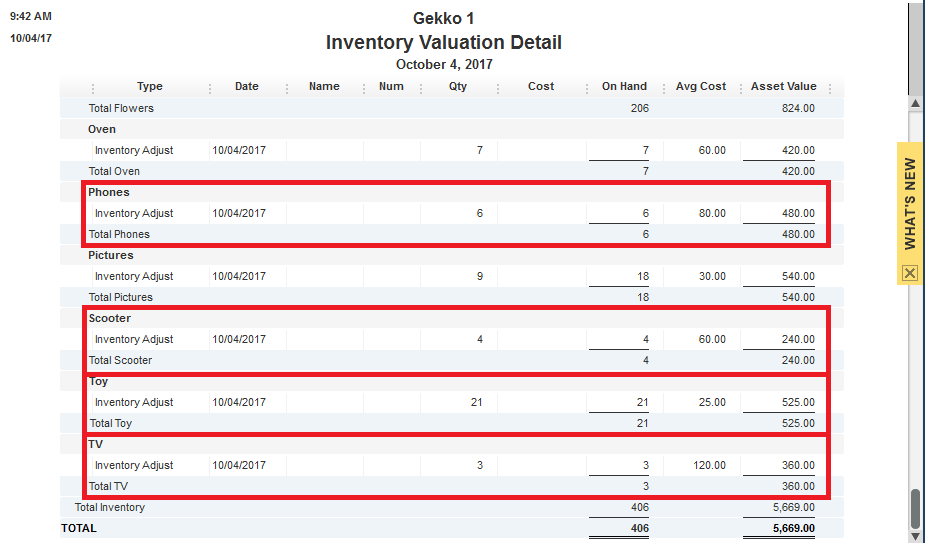
BEFORE – inventory items’ quantity:

AFTER – inventory items’ quantity after adjustments using Business Importer
Option 2: How to adjust Value of inventory item
Import Inventory Adjustments into QuickBooks
Connect QuickBooks Desktop and Business Importer. Select company you’re going to import Inventory Adjustments into.
Step 1: Select your file (Excel) containing Inventory Adjustments.

To adjust value of Inventory Items, use Line: New Value or Line:Value Difference columns in your Excel.
Line: New Value – insert new value of your Inventory Items.
Line: Value Difference – insert the difference in values in your Inventory Items.
Step 2: Select sheet in your file. Select a QuickBooks transaction or list type to import (Inventory Adjustments).
Click on the Next button.
Step 2: Mapping
Connect your labels to QuickBooks Desktop labels.
Save your Mapping to use it in subsequent imports, or upload the saved import.

Click on the Next button.
Step 3: Preview
Preview your Inventory Adjustments you are importing into QuickBooks Desktop. Make sure all labels are mapped in a correct way.

Note: You can correct values in the table, if necessary.
Click on the Next button.
Adjust Inventory items’ values in QuickBooks Desktop using Business Importer: Result
Your import is in process! Don’t wait until it’s finished. Start new import. Run several imports simultaneously with Business Importer.

Check out the items adjustments results in QuickBooks Desktop Reports.
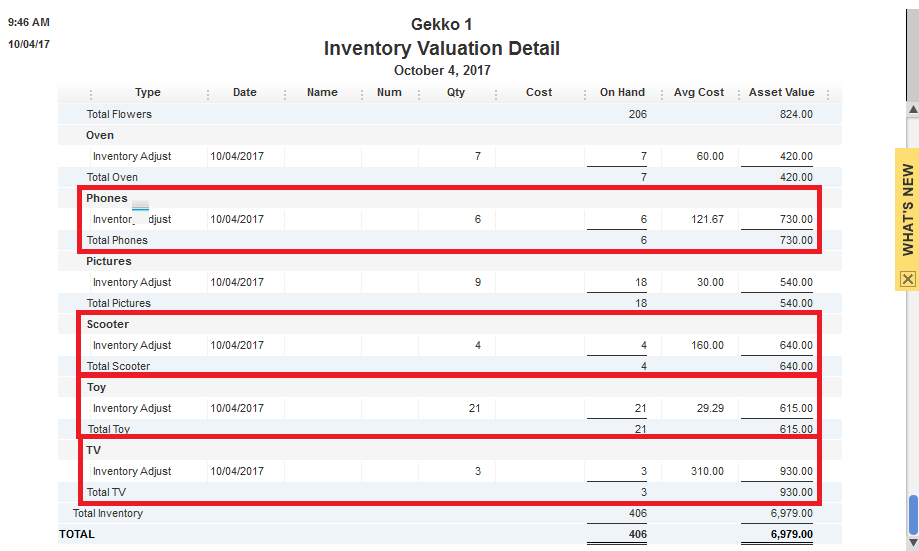
BEFORE: inventory items’ value
AFTER: Aftter inventory items’ value adjustment
Option 3: How to adjust Quantity and Value of inventory item
Import Inventory Adjustments into QuickBooks
Connect QuickBooks Desktop and Business Importer. Select company you’re going to import Inventory Adjustments into.
Step 1: Select your file (Excel) containing Inventory Adjustments.

To adjust quantity of Inventory Items and Inventory Values, use Line: New Quantity or Line:Quantity Difference columns, and Line: New Value and Line: Value Difference in your Excel.
Line: New Quantity – insert new quantity of your Inventory Items.
Line: Quantity Difference – insert the difference in quantity in your Inventory Items.
Line: New Value – insert new value of your Inventory Items.
Line: Value Difference – insert the difference in values in your Inventory Items.
Step 2: Select sheet in your file. Select a QuickBooks transaction or list type to import (Inventory Adjustments).
Click on the Next button.
Step 2: Mapping
Connect your labels to QuickBooks Desktop labels.

Save your Mapping to use it in subsequent imports, or upload the saved import.
Click on the Next button.
Step 3: Preview
Preview your Inventory Adjustments you are importing into QuickBooks Desktop. Make sure all labels are mapped in a correct way.

Note: You can correct values in the table, if necessary.
Click on the Next button.
Adjust Inventory items’ quantity and values in QuickBooks Desktop using Business Importer: Result
Your import is in process! Don’t wait until it’s finished. Start new import. Run several imports simultaneously with Business Importer.

Check out the items adjustments results in QuickBooks Desktop Reports.
BEFORE: inventory items’ quantity and value

AFTER: inventory items’ quantity and value adjustment
Import Inventory Adjustments into QuickBooks Desktop using Business Importer: Mapping Fields
| Business Importer Name | Description | Example |
|---|---|---|
| Account | The Account name of the account associated with the item. AccountRef refers to the account from which the funds are being drawn for this check, for example, Checking or Savings. | Materials Income |
| Line: Item name | Reference to an Item object. Please, provide only its name. | Paper |
| Class name | Classes can be used to separate transactions into meaningful categories. (For example, transactions could be classified according to department, business location, or type of work.). Please, provide only its name. | New Construction |
| Customer | Name of customer. Please, provide its Display name, as soon as if it is different from the one you meant, Inventory adjustment will be associated with another customer. | Janice Johnson |
| Inventory Adjustment number | Inventory Adjustment Number. | IADJ-001 |
| Line: Inventory bin | Inventory site bin location within inventory site | Unassigned |
| Inventory site | Inventory site | Drop Ship |
| Line: New Quantity | New Quantity of the item. | 4 |
| Line: New Value | New Total Value of the item. | 100 |
| Line: Quantity Difference | Either a positive or negative number that shows the change in quantity for this inventory item. | -5 |
| Line: Value Difference | Either a positive or negative number that shows a change in the total value of the entire stock of this inventory item. | 100 |
| Memo | Additional information. | 2 Wood doors stolen from job site |
| Transaction date | The date on which adjustment is done. Default date format is yyyy-MM-dd. | 2017-10-02 |
| Update Inventory Adjustment | Update linked labels. Possible values: true or false. | true |
Check out the Inventory Adjustments import results
FAILED — There were some problems with import. Look into Import Log for details.
FINISHED — Import is finished successfully.
CANCELED — Import canceled by user.
REVERTED — Import reverted by user.
Use Business Importer to import transactions in Excel into QuickBooks Desktop.
Remember, that any question you can address us. We will be glad to help you!
Just leave us a message, call us on (469) 629-7891 or write to support@cloudbusinesshq.com.
Download Business Importer now! 14 day free trial! ![]()
Comments open